How to start a blog in 2021 anxiety-free! A step-by-step guide
So, you are thinking and dreaming about starting a blog but don’t know how to do it? Did you read countless posts about how to start a blog but still not feel quite sure? Or maybe you are feeling overwhelmed by the over 6.4 billion results that Google shows you when searching for it?
I totally understand you! I’ve been there, done that and still working towards it but I’m ready to help you.
If you want to learn how to start a blog in an easy, friendly and anxiety-free way, you’ve come to the right place! Hooray, I’m so happy for you!
I will walk you through all the first steps you need to take to launch your blog so you can start sharing your incredible ideas with the world and our good friend Google!
So, without further ado, get ready to learn how to start a blog in a quick and anxiety-free way!
Why do you want to start a blog?

I know that this question might sound too cliché but it’s an important one. What’s the reason(s) inside yourself that is fuelling your desire to start a blog?
- Do you want to use it as a diary?
- Purely for making money from it?
- Or do you want to provide solutions to problems you have faced?
Don’t worry though, there’s no right or wrong answer and you don’t have to know your why right here and right now. Even I’m still trying to figure it out as it changes the more I become part of the blogging world.
The reason why I chose to start this guide with this point is that knowing your why can be very helpful in keeping you motivated even when it all seems to be going wrong or slow.
Oftentimes, my mind tries to trick me into giving up because numbers don’t seem great and into thinking that I’m just wasting time. When this happens, I remind myself why I’m doing it and then read the very important and meaningful comments I received on some of my posts and my motivation and fire come back!
To try and figure it out, think about what topic you want to blog to be about. A great aspect of blogging is that you can talk about anything you like!
Passion
A wide range of bloggers out there, myself included, start a blog because they are passionate about something. It could be travel, technology, making handmade terrariums or something else. We all have something that we enjoy doing and are truly passionate about.
Your life
Life is a beautiful rollercoaster of emotions and experiences. Whether they are positive or negatives ones, most of them are unique to us and made us the person we are today. Blogging about them can be a great way to either heal from or feel grateful about them while also helping others.
Personal example #1: my blog is a mix of these two topics. I write about solo and budget travelling and about my experiences with anxiety, life and eating disorders because they are a big part of my life.
Teaching
Starting a blog to educate others about something you are an expert on is also a great idea! A blog can become your personal and permanent classroom where anyone can benefit from your knowledge.
Are you totally in love with trigonometry and want to share it with others? Blog about it!
Jokes aside, these are only a bunch of the many topics that can help you understand why you want to start a blog. Once this step is done, we can enter into the more “practical” aspects of this guide.
How to choose a name and URL for your blog?

This is one of the most important steps and what will actually give birth to your blog. If you have read my About page, you might be familiar with the decision process behind my blog name. Long story short, it took me some time to finalise it! (Thanks to my lovely and always present anxiety and overthinking friends.)
For me, it took me time to decide because your blog name is what will become your brand and make people remember you. So, when thinking about what name to choose your blog, this should be:
- Clear: it should help readers understand the topic of your blog
- Straightforward: try to pick a name that’s short and easy to remember
- Easy to spell: try to avoid too many letters or the use of numbers or special characters in it as they might create mistakes
Also, if you can, try to avoid overused or too generic words. This tip might make you feel stressed or anxious at first because it can seem to be limiting your options. However, if you love a name that might sound “generic” which truly connects to your soul and why then go with it. Your soul, articles and words can and will make it memorable.
Personal example #2: before Unsure Traveller, the very first name I had chosen for this blog was “Travel With Dan 95”! Then, I changed it to “Nomad Dani” and then again to my current one.
Although they both described something travel-related, they still sounded either very generic or very 2000’s style!
Unsure Traveller came thanks to the help of my friend and I love it because it combines the main two topics of my blog!
Choosing a short and clear name for your blog is also important SEO-wise. I’ll talk more about SEO later in this step-by-step guide on how to start a blog but it stands for Search Engine Optimisation and it’s what helps Google show your blog to potential readers.
When it comes to what domain extension to use, the most popular and “global” one is .com. However, you can find almost any extension you want! And if you are planning on writing in your native language or targeting mostly people from your country, use the specific extension for it. For example .it is for Italy, .de is for Germany and so on.
How to choose the best hosting provider for your blog?
First of all, let’s talk bout what is a hosting provider?
A hosting provider is what allows you to send your blog online. Basically you “rent” a room in the provider’s web server so your blog can become accessible to people.
Most hosting plans also come with a free domain name for the first year which is a pretty good deal. A domain name is what the readers type in the search bar to get to your website. It’s kinda like your home address!
Personal example #3: when it was time to choose the best hosting provider for my blog, I was on a rollercoaster of confusion! Almost 90% of the articles I had read were recommending BlueHost but I wasn’t feeling too sold to it. Moreover, I saw that its price would have increased by a lot when renewing it.
So, being the great deal lover that I am, I started looking for a more affordable but still high quality hosting provider.
Hostinger, my web hosting of choice
My final decision and the one I recommend for you is Hostinger.
Their premium plan starts at only $1.99 per month and it includes:
- Free lifetime SSL which is something that both Google and people value as it encrypts their personal data
- Free domain for one year
- Up to $150 in Google Ads Credits
- Litespeed servers so your website can load very fast
- A very fun, friendly and helpful 24/7 customer service
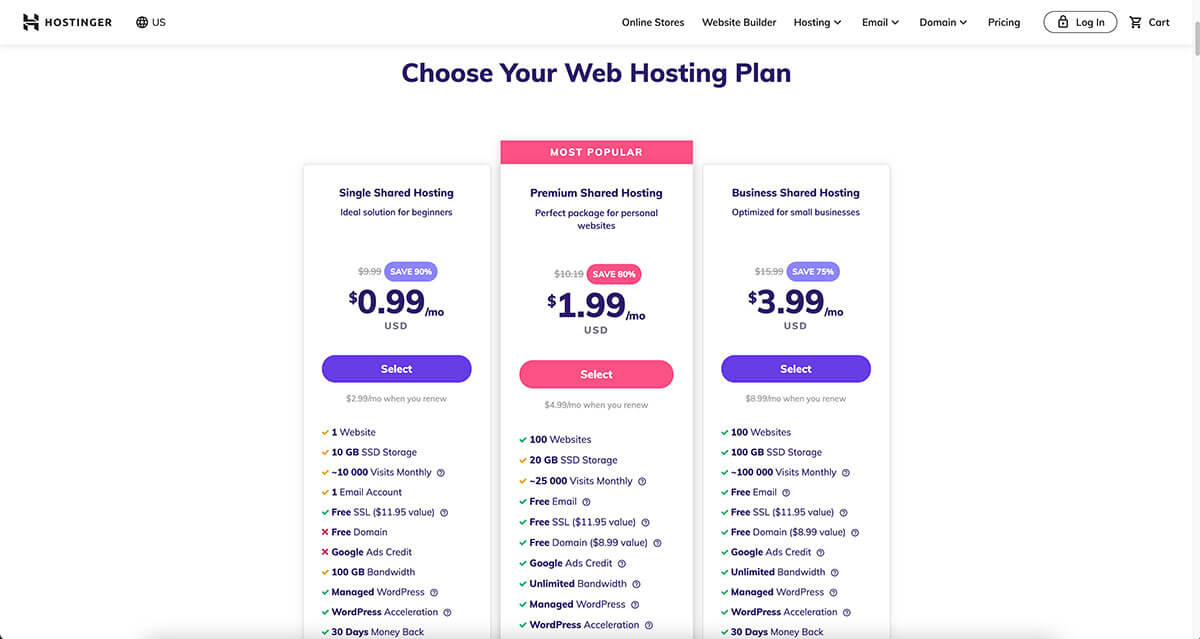
Finally, when you renew it, the price gets to $4.99 per month if you renew for 3 more years, which is still cheaper than other hosts.
I recommend them because I truly believe in their service and quality. Also, their customer service has helped me countless times even with questions that were not related to my plan or their services! And their use of gifs is always on point!
In my opinion, the Hostinger Premium Plan is a great plan to start your blog with. Then, if you need more resources or your blog starts taking off, you can change it according to your needs.
Now that you’ve chosen the name for your blog and rented the room for it, it’s time to start decorating it and making it yours!
In order to register for the Hostinger Premium Plan, follow the steps below:
- Go to Hostinger home page
- Select the Premium shared hosting plan
- Choose for how long you want to pay for the plan, the longer you choose the cheaper
- Fill out your information and it’s done!
After this process is complete, it will ask you the domain name you want to register, some details and if you want to add WHOIS privacy protection. I suggest you get it as this will hide your personal information from the public domain database. This is the only extra I paid for and suggest you get.
What blogging platform to use?
You might have heard of a platform called WordPress. If not, it’s all good! WordPress is software that powers 31% of the internet and the most popular choice when it comes to blogging.
Why, you ask? Because it is totally free, easy to use and customise, open-source and constantly updated by lots of developers that keep it stable and safe.
Don’t get confused with wordpress.com though as this is a hosting provider. The one I’m talking about is wordpress.org. But you won’t need to download the file from it as most hosting providers have a 1-click WordPress installation! Isn’t this great?!
If you decided to go with Hostinger this is what you have to do to install it:
- Log into your admin area
- Scroll down to Website
- Click on Auto Installer and select WordPress
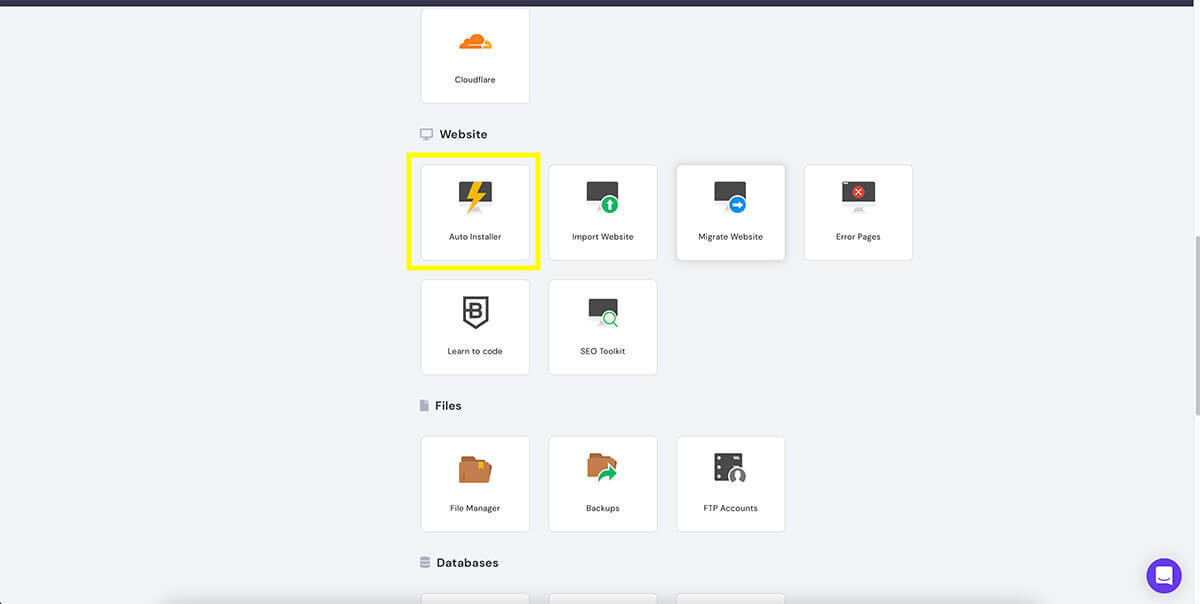
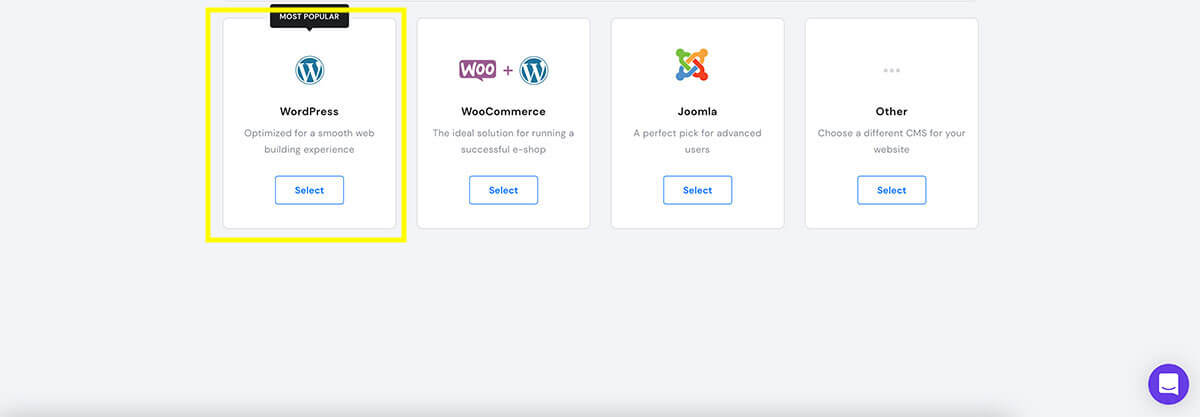
- Choose a username and password for your admin account and write your website’s name title where it says website title
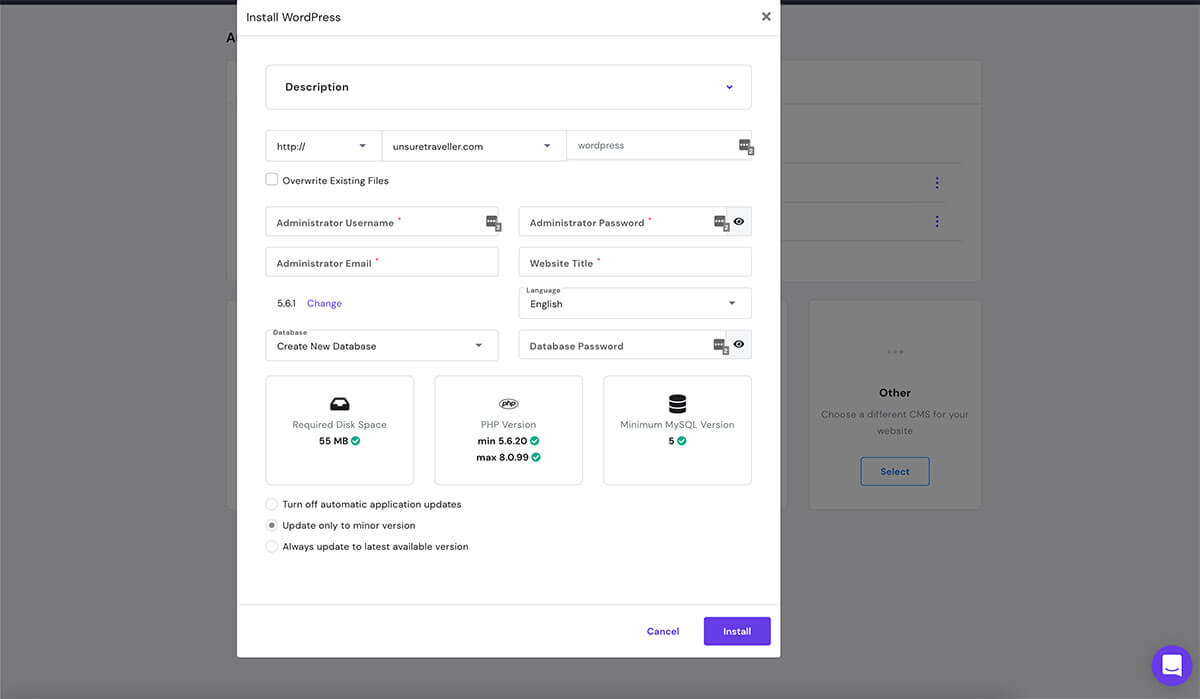
- Click Install
It’s done! Wonderful! Your blog is coming to life!
Now that WordPress is installed, you can access its admin area through http://yournewandfantasticblog.com/wp-admin (substitute .com with the extension you chose if different from it)
How to customise WordPress
Before we dive into the world of customising the look of it, I want to suggest a few settings I always change after having installed WordPress:
From the dashboard go to Settings → General Settings and:
- Set your site’s tagline which a short description of what your website is about. This usually appears next to your website name on Google or when sharing something on social media. You don’t have to do it straight away and you can always change it at any time, but it’s good to know what it is and that’s there
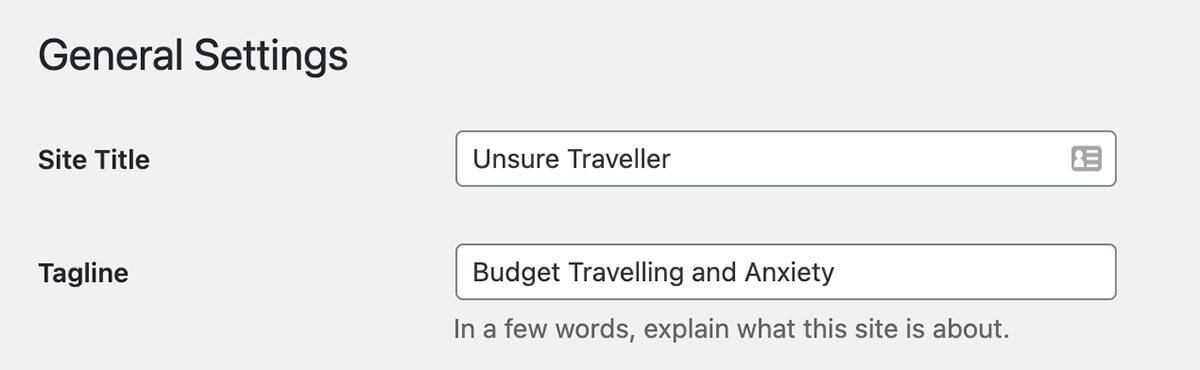
- Disable “Anyone can register” unless you are building a membership site
- Set your timezone and language
Then, still from Settings, click on Permalink. Permalink is essentially the structure of your website URL. You can choose from some pre-made structures or make a custom one.
For a blog, I’d suggest you select “Custom Structure” and then click on %category% and %postname%.

This way, if you publish a post called “I love Sydney” and link it to the category Australia, the URL will appear like http://yournewandfantasticblog.com/australia/i-love-sydney
Which is better both for the reader and for Google.
Reminder, try not to change the structure of the permalink after you’ve started publishing posts because this can end up breaking your site and create unwanted 404 pages!
Choosing a WordPress theme: free or premium?
Sooo, now we are getting to the fun part of this guide on how to start a blog, which is choosing a WordPress theme!
But, what is a WordPress Theme?
A WordPress Theme is what gives life and look to your blog.
When it comes to how to choose a WordPress theme, which one to choose and where to get it, there are usually three main options.
Pros and cons of using a free WordPress theme
There are countless themes for WordPress that are free. One of their pros, besides their price, is the fact that they are great if you are just starting out and want to experiment with different styles. This way, you can learn and see how you want your blog to look without having to spend money.
Most of them also have big support communities which are very helpful and you can easily find that most of the questions you might have are being asked and answered before.
Moreover, if you find one that you love, then go with it! You don’t always have to buy one in order to get a beautiful and fully functional blog.
One of the cons of using a free theme is usually the lack of customisation options available to you. Because most free themes also offer a paid version of it, they tend to reserve them for paid customers. So, you might need to rely on external plugins or custom CSS to achieve something a little more complicated.
However, you’ll find out what you want and need by trying, learning and keep going, so don’t start with something that offers you too much as you might not need it!
Some of the best and most used free WordPress themes are:
How do you install a free theme?
To install a free theme, head over to Appearance → Themes → Add New. From here, you can search for a specific theme or scroll and look at the ones available. Once you found a theme you like, click on install and then activate.
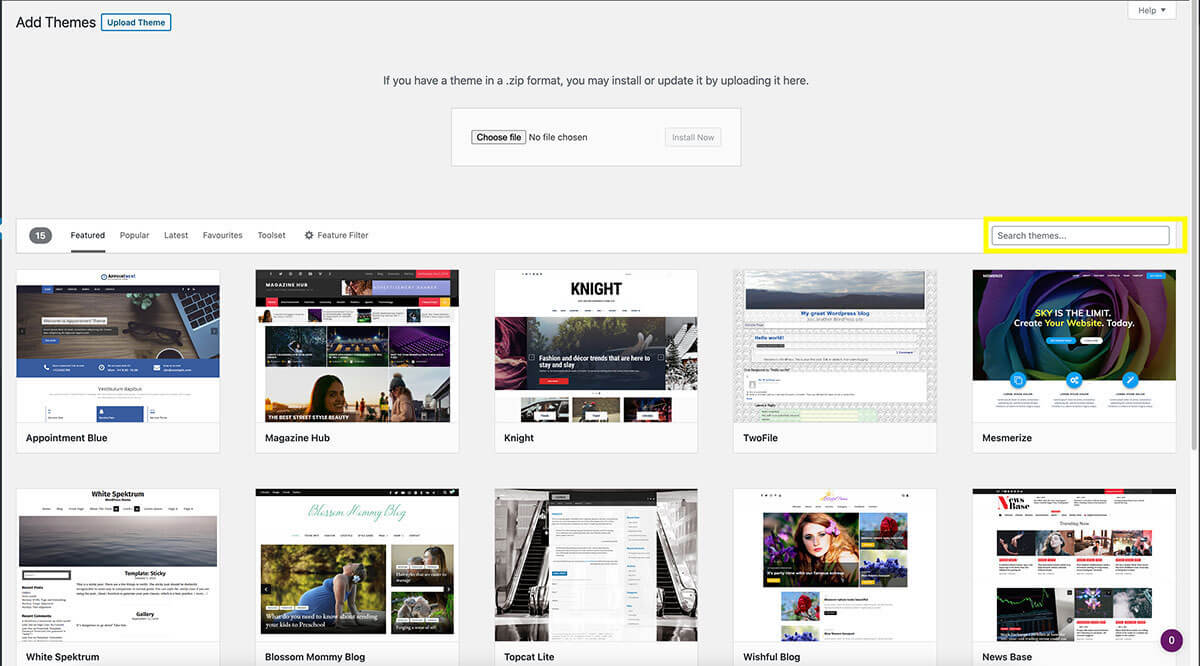
Try to choose a theme with lots of positive reviews and with an active support community so that you can ask for help if needed.
Pros and cons of using a premium WordPress theme
So, if there are some fantastic free themes, why should you pay for one? Good question my friend because I asked the same one to myself!
You know that I prefer the word free to the word paid so it wasn’t an easy decision going for a paid theme, but it was worth it!
One of the pros of paid themes, which is the cons I talked about in the free themes section, is that they tend to give you a lot more flexibility and options when it comes to customising the look of it. They also come with a bunch of premium plugins that you might want to use and provide direct contact with the developers for any questions or information.
Furthermore, they are often designed with speed and SEO in mind and they offer lots of ready-made demo websites that you can easily upload and start customising.
When it comes to cons of paid themes, besides the fact that you will need to buy them before sending your blog live, is that some of them require you to renew the license every year to use their premium functionality. Not all of them do this, but it happens.
By being totally honest with you, the main reason I went with a paid theme at first was because of the pre-made demo websites. Mostly because I didn’t know how I wanted my blog to look and I didn’t have much knowledge of WordPress or anything related to it.
For my website, I chose a theme called Kalium due to the fact that I really liked their travel agency demo site and wanted that look for my blog. However, once I started understanding more and more stuff and focusing on speed and ease of use, I moved to a more minimal and clean look. But I still use Kalium as my theme and can’t complain about it!
It’s an affordable, fast, professional and well-supported theme and you buy it once and it’s yours for life!
If you are looking at buying a WordPress theme, I’d highly suggest you checking out Theme Forest by Envato as they offer the widest selection of premium themes and they are all in the range of $30 to $60.
I’ve also heard a lot of positive reviews about the premium version of GeneratePress, one of the free themes I mentioned above. It’s extremely light and, from what I saw, their support team seems to be always ready to help you!
It might be easy to start stressing out or overthink about having to choose a theme. (At least it was for me!) However, remember that a theme is not forever and you can always change it or pick new ones because our style evolves just like us.
How do you install a paid theme?
Installing a paid theme is slightly different from installing a free one but it’s just as simple.
If you bought it from Envato Market, you most likely got a zip file.
Go back to Appearance → Themes → Add new and click on Upload theme. Upload the zip file, click on install and then activate it!
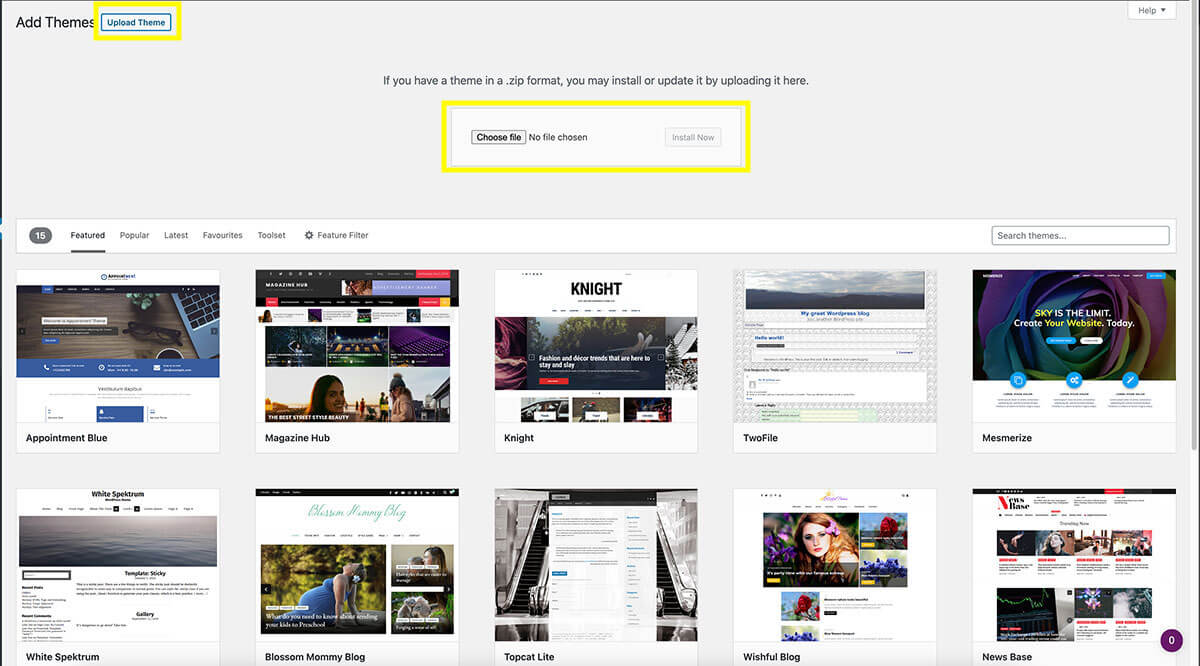
All done! Your theme is now active and your blog has a brand new and fresh look! Yay! I’m so happy for you!
Hiring a developer
The third method is probably the most expensive one but also the one that gives you the most control over the design of your website.
Hiring a developer to create your blog will also allow you to implement any function you might want along with giving it a look that’s uniquely yours.
Now that you have decorated the room, we need to furnish it with some content! So it’s time to start writing some pages and posts to share with the world!
I know I said it before but well done!!
How to create content on WordPress
When it comes to creating content on WordPress, the two main tools you are gonna use are pages and posts. They are both very important but also pretty different in how they are structured and what they do.
What is the difference between a WordPress page and post?
A WordPress page is a “one-off” or “fixed” article that will often stay the same for a long time. So, example pages are:
- Home page
- About page
- Contact page
And so on.
Moreover, WordPress pages:
- Are hierarchical (so they can have parent or sub-pages)
- Don’t let people comment on them (unless you allow them to)
- Don’t have a published date or author
- Are not usually shared on social media
A WordPress post, on the other hand, is the actual article you would write on a more frequent basis. They are displayed in chronological order and they are organised based on categories and tags.
In addition to this, WordPress posts:
- Allow people to leave a comment
- Can be shared on social networks
- Are often displayed on the blog page of your website
Now that you are aware of their differences, what’s the next step on this guide on how to start a blog?
Try and guess, I can wait…
Are you ready?
Correct! It’s time to utilise both tools and start writing some content!
If I was you, I’d start by creating the main pages of the website. This way you can build the skeleton of your blog and submit a sitemap to Google. (We’ll get into that later).
How do you create a WordPress page?
Simply head over to Pages and click on Add new.
From here, you can give the page a title and start writing the content of it.
Take your time to create:
- The home page explaining what your blog is about
- An about page so people can get to know who’s behind the words
- A contact page if you want people to get in touch with you
Remember that you can always edit them or change their content or style later on. Mine have gone through quite a few edits since I started this blog!
What about posts? How do you create them?
The process is the same as for pages!
Go to Posts and click on Add new.
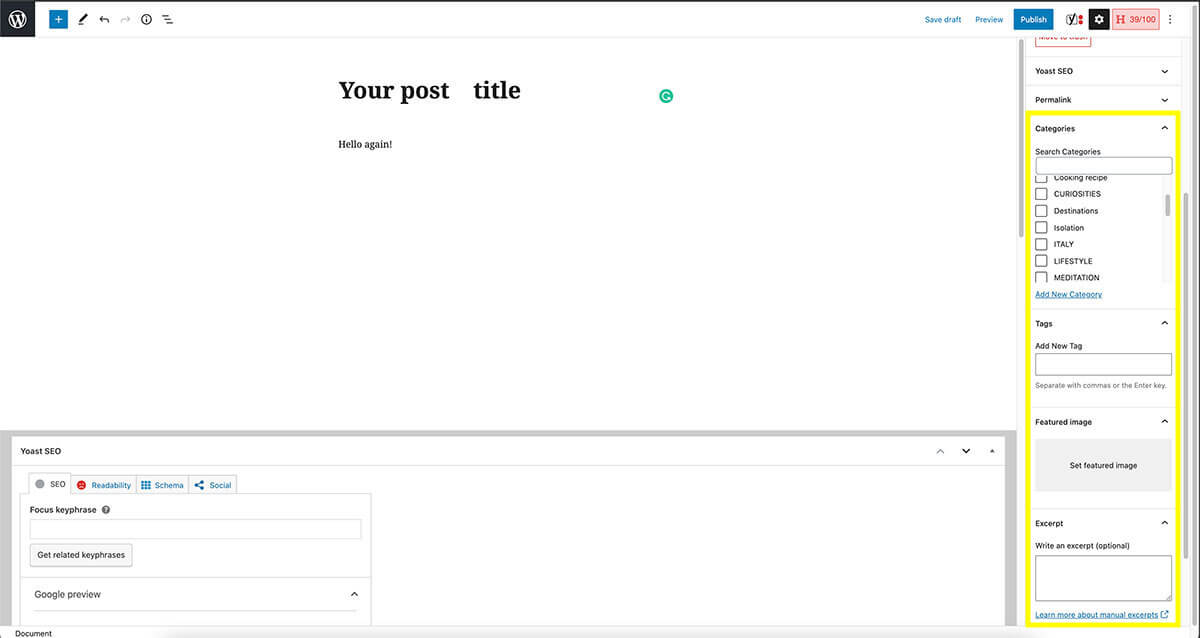
On the right side, you can add categories. Think about the main topics you will talk about in your blog and create categories for it. You can always add new ones later and add a post to multiple ones.
However, when you select more than one category, WordPress will ask you to choose a primary one which will appear in the structure of the permalink. Try not to change it after the post has been published as it can create some broken links.
Below the categories tab, there’s the tag section. Tags are a sort of micro-category or keywords for what your post is about.
Then you find the featured image which is the picture that will appear in the Google preview, the blog post preview or when you share it on social media.
Finally, the excerpt is a short description of your article which will also appear on Google and social media.
The structure of a WordPress post or page
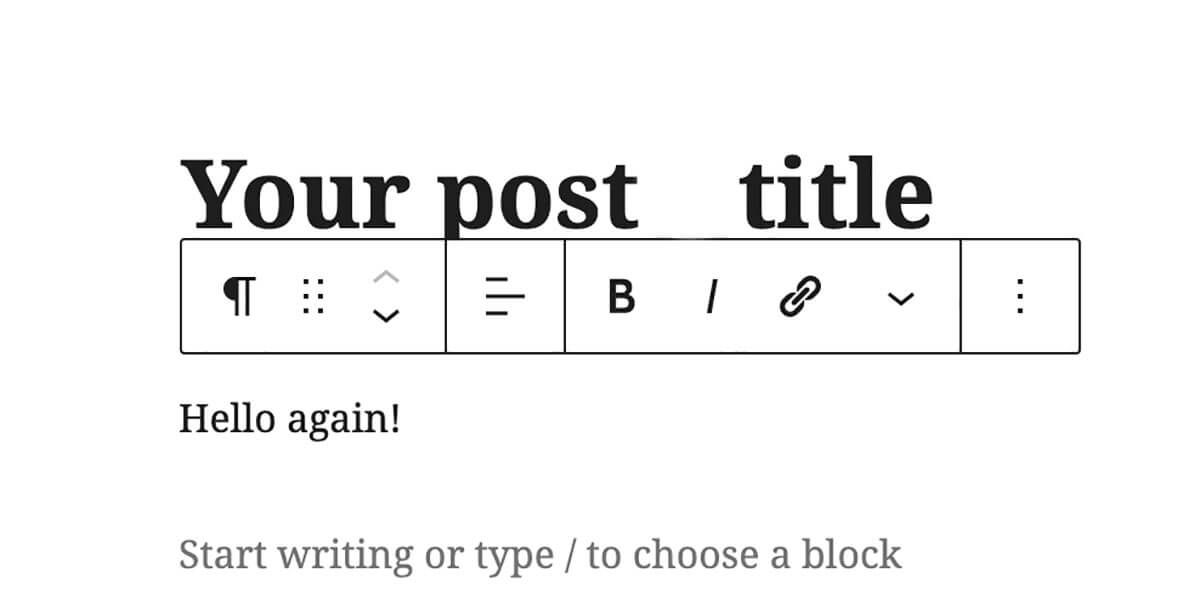
When you start writing your post or page, the default block will be a paragraph one. Once you start writing, some options will appear over your text and they are:
The first square allows you to change the selected block, and the text in it, into a heading, list, quote and so on.
When writing, try to use H2, H3 and H4 headings that also have your selected keyword or similar keywords in them. H1 is your title and it should only be used once.
The next square is to decide the block align, whether you want it on the left, centre or right. I often use it when I upload pictures and want them centred.
Next, we have the option to make your text, or part of it, bold, italic or add a link to it.
If you want to add a picture, or embed a social media post or add a plugin related function, simply click on the + icon and select what block you need.
How to add an image to a post or a page
To add a picture to your post or page, you can search for and add an image block through the + sign and Upload it straight from there.
However, what I prefer to do is to go to the Media section from the admin panel, upload all the pictures I need and then select Media Library which is next to Upload. I find it and easier method compared to uploading a file while writing a post which has given me a few problems before.
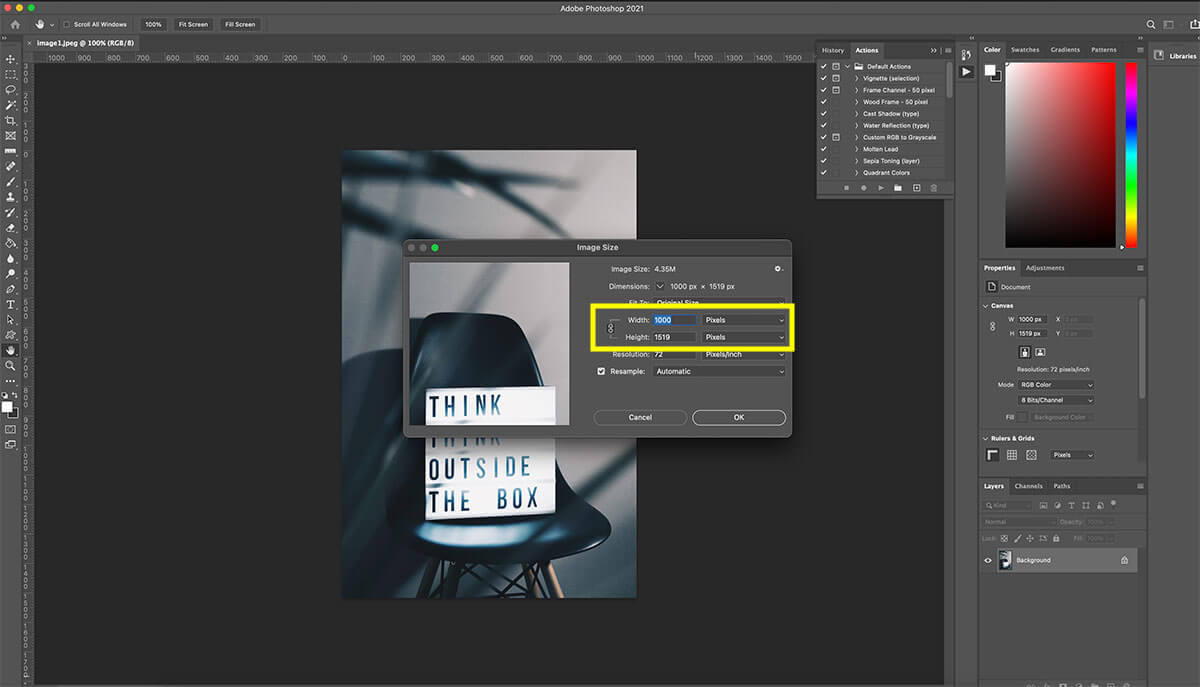
Do you want to know how to perfectly resize the image to post on your blog?
I’m glad you asked and I’m happy to help you! What I do with my image is changing their size to 1200px width or height depending on the crop of the shot. I do this with Photoshop but you can use any editing software, even Preview for Mac.
If you have access to Photoshop and want to resize your image, simply:
Press CMND (Control) + Option + I and then select the width and or height you want.
To export a file for web using Photoshop:
Go to File → Export → Save for Web
Choose JPEG and set the quality between 60 to 80 and then Save.
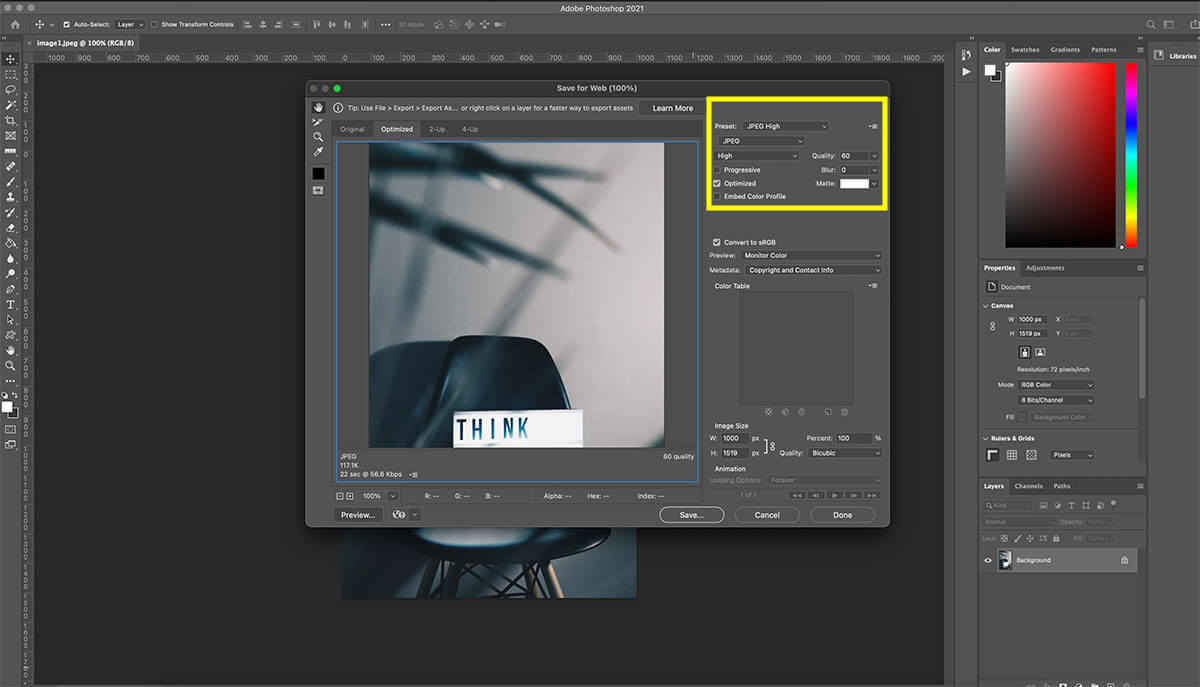
Then, to further compress the shot without losing any more quality, head over to TinyPNG, upload the file and download the compressed file.
This tool can help you save a bit more space which in return it can help your blog or post to load faster.
Once your page or post is ready to be published, simply click on Publish and it’s done! Otherwise, you can click on Save draft if you need to save it without publishing it.
The more I write this guide on how to start your blog, the more excited and hopeful I feel that it can help you start this amazing journey!
Ok, so everything is now set and ready to go, however, you need to tell Google that your blog is now live and it exists!
How to submit your website to Google
Submitting your website or blog to Google is very easy and it only takes a few minutes.
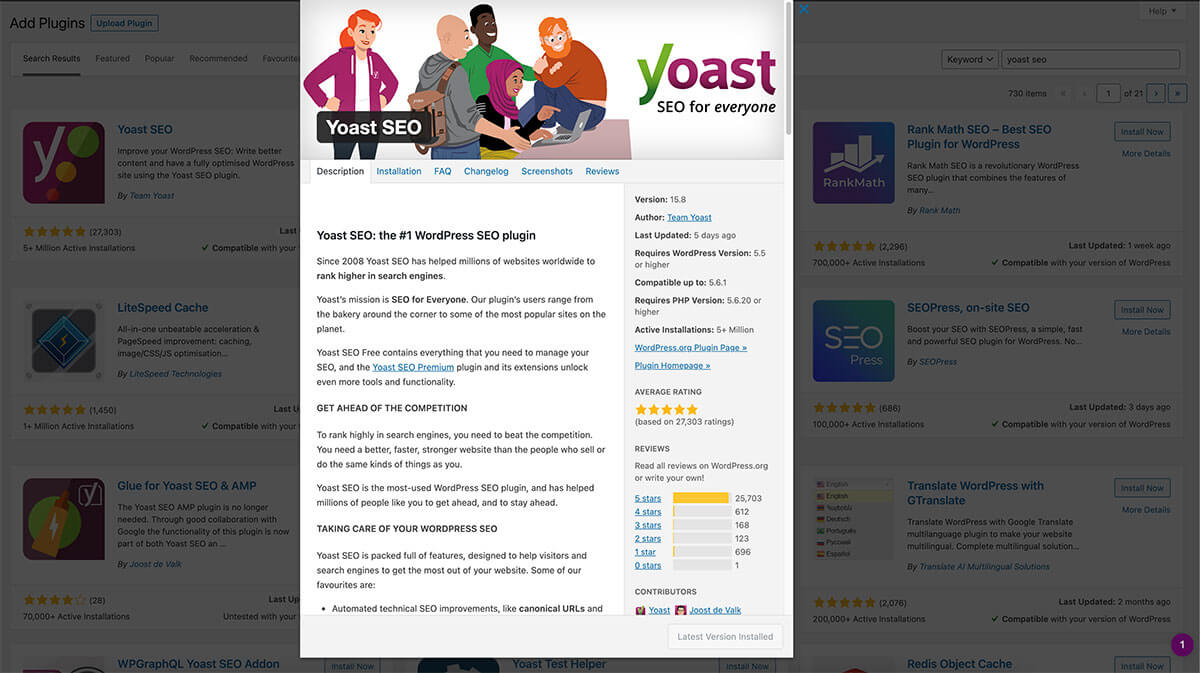
First, you need to install the Yoast SEO plugin. I’m planning to write a separate post about all the best plugins for WordPress and the ones I use my guide on the best WordPress plugins you need is now live, but Yoast gets a special mention in this step-by-step guide.
What is Yoast SEO?
Yoast SEO is the most popular SEO plugin for WordPress! It helps you understand if your article is SEO ready, gives you tips on what sections need some improvements and it helps you make it ready for Google.
To tell Google that your website is live and ready to be found by it, you will need to submit your blog’s sitemap. Don’t worry though, it’s easy to do! Just keep following this guide on how to start your blog.
How to install Yoast SEO on your WordPress blog
To install Yoast SEO, or any other plugin, on your blog simply head over to Plugin and then click on Add new.
Search for Yoast SEO, click Install and then Activate!
Now that the plugin is active, follow its setup process to the end.
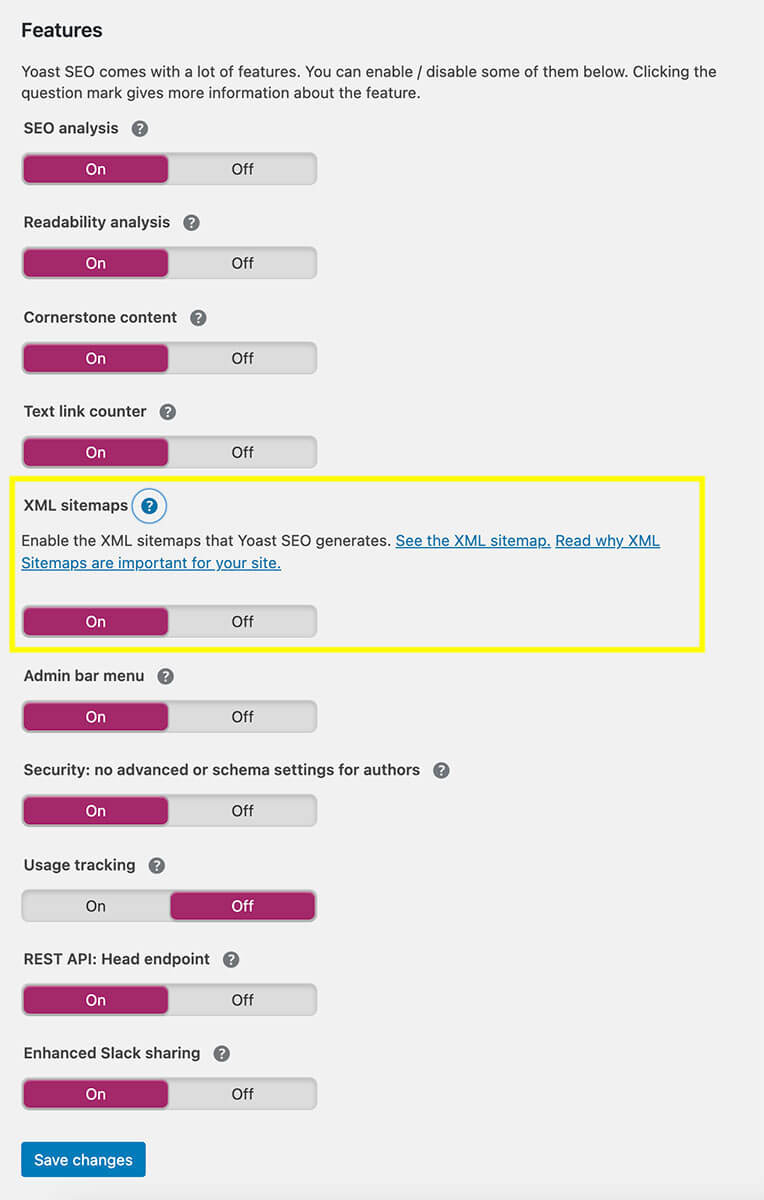
Once everything is done, on the admin dashboard, you’ll find a new SEO tab.
Head over to it and go on General → Features and then click on the question mark next to XML sitemaps. This will open up a brief description of what a sitemap is and the link to your blog’s XML sitemap.
Let’s move over to Google now.
Go to Google Search Console and click on Start Now.
You will need to first log in on your Google account or create a new one and then add a property. I suggest you adding a Domain property as I’ve had problems with the URL prefix method.
Follow the instructions and then verify it through DNS. You can find a tutorial for any hosting provider and if you are using Hostinger, have a read at this guide they wrote on how to change DNS to verify your property.
After the verification process is done, go back to Google Search Console, click on Sitemaps under Index and enter the sitemap URL that Yoast gives you when you click on See XML sitemap. It’s all done!

Now Google knows that your blog exists and it will index it! Woohoo! Well done!
One last step I want to share with you is how to install Google Analytics on your website.
How to install Google Analytics?
Just like the name implies, this tool allows you to track your visitor’s behaviour, what do they do on your website, where they come from and lots of other useful data to understand who and how people interact with your blog. And all of this is for free!
To install Google Analytics on your blog, I highly suggest you follow this guide by WPBeginner where they tell you exactly all the steps you need to follow to do it correctly.
Final thoughts
Because I both wouldn’t want you to feel overwhelmed or stressed by receiving too much information at once, but to also create more in-depth and useful posts for you, I will end this guide on how to start your blog here.
After this post, I’m planning to write more ones related to what are the best WordPress plugins you should use my guide on the best WordPress plugins you need is now live, how to speed up your blog with a CDN, how to monetise your blog and more.
As you can see, there are countless topics to talk about when it comes to starting and maintaining a website.
However, you now have all the information you need to begin your blogging journey. From here, it will be a great learning curve full of ups and downs that are there to help you shape this beautiful room you are sharing with the world.
Take your time and start writing about what you love. I know that writing with SEO in mind is a fundamental rule to follow but this also takes time. I’m still learning soooo much about it because it’s not something that happens in a day.
I hope that you found this step-by-step guide on how to start a blog helpful and that it made you feel more comfortable and less anxious about doing it. Feel free to write your thoughts or questions about it in the comments below!
Pin it for later!